Comfort Food Trumps Hate
I’ve spent so much of the last month filled with anger, dread, and utter panic for what the next four years have in store, I’ve neglected the habits I often use as a crutch to zen me out.
In the time since my last post, my initial fear, disdain, and disgust for the upcoming four years has been replaced with a renewed sense of responsibility to continue living my best life, but more consciously–to give to my community, with a focus on those who will be most affected by these upcoming years, to spend more time with my family, with the specific intent to be the best role model I can be for my younger brother, and to find more time to work on my health, with explicit regard to mental and emotional stability. And in doing so, I find myself reverting back to the hobbies that zen me out most–an evening spent cooking with and for the ones I love, an afternoon with a warm bowl of ramen and a book, or maybe a two-hour breakfast by myself–a rare indulgence in the rushed madness of the adult world, as my friend Nadia pointed out to me last night.
So I called up a friend of mine, a renowned chef and restaurateur in his own right, and asked him to make my terrible electoral Monday a little bit better. I brought the ingredients and a rough sketch of the flavor profile I was chasing, he brought the technique and unreal knife skills. We poured a glass of wine, and below is the result.
FENNEL GINGER SALMON
**Recipe adjusted to serve four**
I’m separating this recipe into two parts, as the broth is an incredible winter soup on its own. In fact, we made the soup first, then later paired the salmon with it to create the actual dish.
Fennel Broth
Ingredients
4 bulbs of fennel
4 tablespoons of coconut oil
1/2 cups of roughly diced shallots
4 cups of seafood stock, preferably lobster stock
3 tablespoons of fresh, grated ginger
2 tablespoons of ground fennel seeds
1 tablespoon of ground coriander seeds
1/2 cup of coconut flavored Greek yogurt/skyr
1 tablespoon of flour (optional, as thickening agent for the broth)
1 teaspoon of lemon zest
3 whole star anise
Preparation
Cut the fennel bulbs in half, and discard the white core at the bottom of the bulb. Slice the bulbs across into thin slices, so as to speed up cook time.
Place the coconut oil in a large saucepan, and if solid, melt over medium heat. Add the star anise, fennel, and shallots, and cook until the shallots are translucent. Pour in the seafood stock and bring to a boil, then cover the saucepan. Allow the mixture to simmer for 20 minutes.
Remove from heat, and let cool for 10 minutes. Take out the 3 pieces of star anise, and discard. Then pour the mixture into a food processor or blender, along with ginger, ground fennel seeds, coriander seeds, salt, and pepper. Puree the mixture and return to the saucepan for a second boil. Add the lemon zest and a generous squirt of lemon. Whisk in the Greek yogurt.
While the mixture approaches a boil, pour a small ladle into a bowl and whisk in the flour, making sure no lumps form (this will thicken the broth to a more bisque-like consistency).
Pour the contents of the bowl into the broth, and bring to a full boil.
Soup is ready to serve!
If you want a bit more out of your broth, keep reading for the salmon recipe!
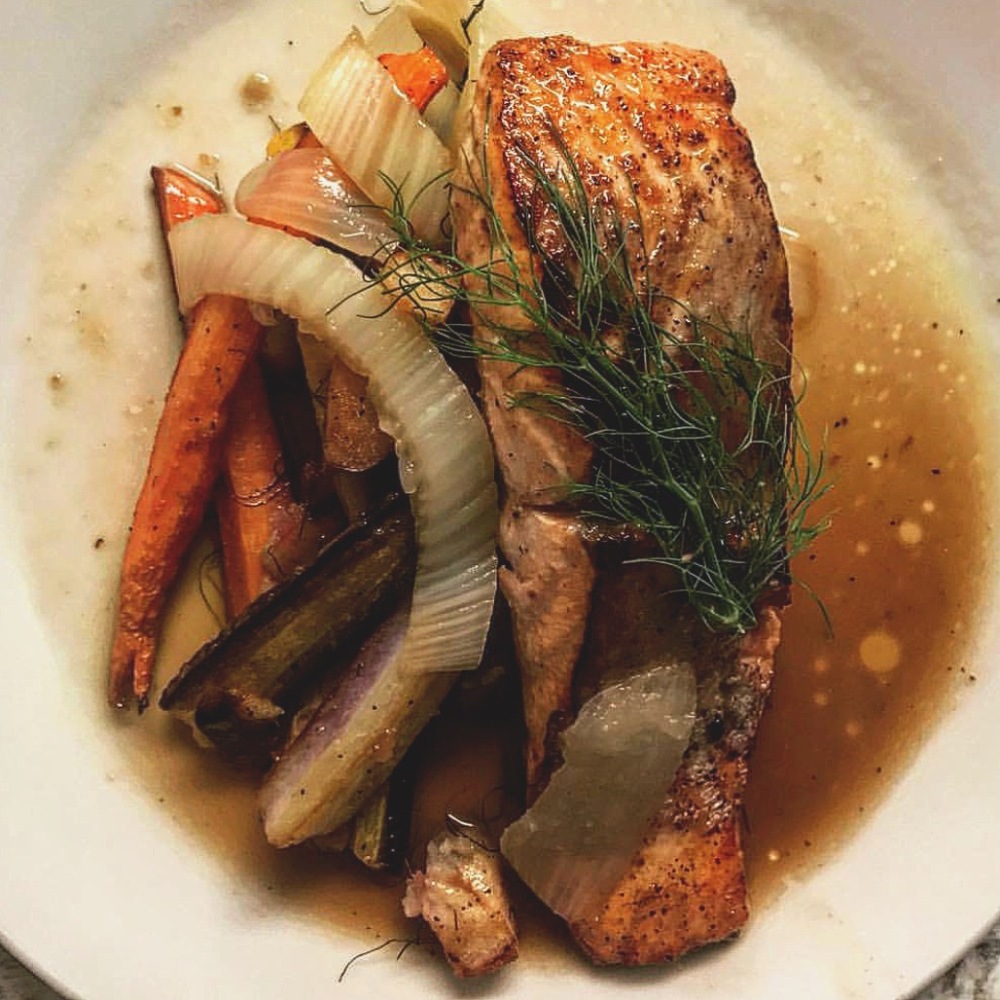
FENNEL GINGER SALMON
Ingredients
3 carrots, sliced vertically (I used a variety of purple, yellow, and traditional carrots)
1/2 cup of apple, sliced
1/2 cup of shallots, sliced
1/4 cup of fennel, sliced
1 tablespoon of ground ginger
2 cloves of garlic, minced
2 parsnips, sliced vertically
4 tablespoons of olive oil
2 tablespoons of Chinese 5-spice
4 salmon steaks
1 whole lemon
1 sprig of rosemary
Preparation
Preheat oven to 400 degrees.
While the oven preheats, line two separate baking sheets with foil, and coat both with cooking spray.
On a chopping board, lay out the salmon steaks and sprinkle 1 tablespoon of Chinese 5-spice, salt, and pepper to taste. Squeeze lemon on all sides, generously. Let it sit for a few minutes.
Put carrots, apple, and parsnips on one baking sheet, drizzle with 1 tablespoon of olive oil, sprinkle 1 tablespoon of Chinese 5-spice, salt, and pepper to taste. Toss in oven with a sprig of rosemary.
While the apple and veggies roast, heat up 1 tablespoon of olive oil in a skillet and add the minced garlic, fennel, and shallots. Saute until the shallots are translucent, then spoon out the mixture and evenly spread it onto the sheet with the roasting veggies.
Heat up another tablespoon of olive oil in the same skillet (no need to clean it–the skillet should retain some of the garlic flavor) and on a high heat, add the salmon steaks. Grate 1 tablespoon of ginger directly over the salmon. Give both sides a good sear (about two minutes per side), and remove from heat.
Put all four salmon steaks on the second sheet, and layer round slices of lemon over each steak.
Bake in the oven for about 12 minutes.
While the salmon and veggies are baking, reheat your broth to a piping hot temperature, and place the desired amount into four shallow bowls. Once cooked, place veggies over the broth, then salmon on top, and fall in love a little bit!